Search This Blog

Showing posts with label Foodie Friday. Show all posts

Friday, May 7, 2010

I reminisce and wish you a Happy Mother’s Day {Foodie Friday}

I began to reminisce today as a friend of mine who teaches Kindergarten was talking about how she was working on a project full of awesome Kindergartener quotes for their Mother’s Day party at school tomorrow.  I thought back a couple of years to when Sarah was in Kindergarten and I remembered the cookbook that her teacher put together full of recipes that the children dictated to her. 

I remember that as I read it, I laughed so hard that I cried. And probably peed a little. 

You know it’s probably true.  And guys… it’s just a reality of life for us girls.  Get over it.

So, for your enjoyment today, I will share with you my Brownie Recipe as my daughter dictated it to her Kindergarten teacher three years ago.

~~~~

Brownies
As told by Sarah

I know just how to make these because we cooked them up last night!

You need:
4 eggs
Lots of sugar
1 cup of powder
Melted chocolate – the kind that are in bowls at the store and you melt it

Put it in a bowl and mix it with a spoon – like stir it (motioning stirring with hands).  Then put it in a pan that is a rectangle.  But before that you have to put this blue thing in and spray it.  Then cook it in the oven.  The oven is really hot!  Cook it for maybe 1 hour or 2.  Then you let it cool outside the oven.  Everybody gets to eat them but they have to be in small rectangles so everyone gets one, OK?

~~~

Now if you compare it to my actual recipe, she’s not all that far off.  Quite a bit closer, at least, than the boy who described cooking pasta at 7 degrees for 8 minutes and then letting it cool off. 

Did your kids’ teacher do this project with them at any point?  I’d love for you to share their “recipe.”

I hope each of you has a wonderful Mother’s Day this weekend. 

Friday, April 30, 2010

Cook’s Illustrated Challenge #1: Grill-Roasted Pork Loin & French-Style Mashed Potatoes {Foodie Friday}

I told y’all earlier this month that I was going to make two random recipes from all of the Cook’s Illustrated issues I have sitting around sometime before the end of the month.  (Read about my challenge here.)  Well, that sometime happened to be just this week. 

I’m nothing if not a really good procrastinator. 

It just so happened that my two dishes for the month, Grill Roasted Pork Loin (July/August 2005, pgs. 6-7) and French Style Mashed Potatoes (March/April 2009, pgs. 18-19), were the perfect compliment to one another and I was able to just make a single, complete meal out of it. 

First, I fully read both of the articles and recipes.  Forever ago. 

So when I was at the grocery store to buy the pork loin, naturally I couldn’t remember what kind to get, so I had to call home and have my man look for me.  In the article, CI lists their top choice as the Blade-End Roast.  Naturally, I couldn’t find that at my grocery store, so I had to go with CI’s second choice, the Center-Cut Roast. 

100_8055

And, since it had been so long since I had read the recipe and did not re-read it fully that morning, I didn’t realize that the loin needed to soak in a brine for 3-4 hours in the refrigerator.

Oops.

So I just fudged a bit and did not brine it nearly as long, but was able to for just a little while.

I decided to use their “Sweet and Savory Spice Rub” so I toasted some cumin seed, coriander seed and fennel seed then ground them and mixed them with some ground cinnamon and allspice.

 100_8054  100_8056

And then I realized it was supposed to sit out for an hour at room temperature after being seasoned.

Double oops.

100_8060I did do the grill instructions as called for.  I browned it on all sides over direct flame and then let it roast over indirect heat.  It cooked a lot quicker than I expected.  It was pretty close to being done after the initial 20 minutes.  It probably only cooked another 5-10 minutes longer, which was just enough time for me to pull together the mashed potatoes.

100_8067  100_8070

I couldn’t figure out what made mashed potatoes “French Style” for the life of me before I read the article.  The writer talks of having had these smooth and stretchy, garlicky and cheesy mashed potatoes he encountered one time in Boston.  The French dish is known as aligot.

First, I peeled and sliced my Yukon Gold potatoes, as called for, and boiled them until very tender.

 100_8049 100_8052 100_8053

I got ready to hand-grate my mozzarella and Gruyere cheeses and then realized that I would be using the food processor already for the potatoes… I could just go ahead and use it now for the cheese as well. 

100_8057

100_8059 After adding the butter and garlic, it was a fairly thick mass.  100_8061Then, I added milk and processed for another 10 seconds or so.  I opened the top to scrape down the sides and as I went to click the top back on, something went wrong.

100_8062The top was stuck on and required male and screwdriver intervention to pry it loose. 

100_8063And as you can see, I mean an actual screwdriver… not the drink.

Although I maybe could have used the drink at this point as well.

After we got the top off, I wasn’t going to dare to put it back on at the time, so I had to forego the 2nd 10 seconds of processing and went straight to the saucepan.

I’m still not certain if the food processor is forever damaged

In the saucepan, I added the cheeses a little at a time and was supposed to stir “vigorously” over medium heat.  I had to hand the spoon over to my man for a few minute of vigorous stirring because… WOW… that was a work-out.

Who needs Jillian Michaels when you have French-Style Mashed Potatoes to make.

100_8064Mine did not turn out quite as creamy, smooth and elastic as the writer made them out to be, but I don’t know how much of a difference that extra 10 seconds in the food processor would have made. 

100_8066

My daughter was impressed that I made my plate “restaurant style.”  She was so impressed that when we had leftovers the next night, I made everyone’s “restaurant style.”  If she only knew what lengths other real food bloggers go to in order to style and photograph their food, she wouldn’t be nearly as impressed with my pitiful display.

 100_8072Regardless of all the ways I didn’t or couldn’t follow the instructions, both the Grill-Roasted Pork Loin and the French Style Mashed Potatoes were really good.  I am such a sucker for a good garlicky cheesy mash and these were exceptional.  The Gruyere cheese added a nice sharp saltiness and along with the garlic….. oh wow.  Good.  The pork loin was excellent as well.  I would probably just use my normal spice rub on it next time since it has all of the same ingredients and quite a few others along with some brown sugar.  But it was moist, and flavorful. 

I will let y’all know this weekend what my next two recipes will be.  I’ll also update the recipe blog with the recipes if y’all are interested.  But right now, it’s late Thursday night … no… it’s early Friday morning.  I’m tired.  That is all.

Friday, April 16, 2010

Mexican Mole Sauce {Foodie Friday}

I have become convinced that a staple in the southwestern or Texan kitchen should be mole (mole-lay) sauce. It is so incredibly versatile and... well... good.

You may be asking, "What is mole sauce?"

Well, I'll tell you as best I can.

Mole sauce is to Mexico what marinara is to Italy.  In simplest terms, it is a blend of chiles, nuts, garlic, onions and in some cases, the seemingly secret and surprising ingredient, chocolate.   According to this site, individual home cooks have their own specific versions and special ingredients.  This Wikipedia page gives a list of different types of mole sauces.

I decided not long ago that I really wanted to make mole sauce.  I never had made it before but had tasted it at some Mexican restaurants, so I wanted to try to make it myself.  And when something like that gets in my head, I can’t shake it.  So, I began searching the internets for a recipe.

I found that there are lots of easy recipes out there for mole, and certainly buying it off the shelf would be easiest. But as I usually say, "Easiest is not always best."  A good mole is complex and has such a depth of flavor because of the intensive preparation of the roasting, toasting, grinding and blending of the ingredients.  So-called easy versions just didn’t seem to me that they would make the cut.

For instance, this recipe, by virtue of using green chilis, must be an attempt at a mole verde.  But then why add chocolate?  Why is the color not actually green? And where are the toasted seeds? It may be good, but not what I would really call a mole sauce.

And this recipe only uses chili powder and, again, no nuts or seeds in it.

The most common mole sauce that we see in this area is probably mole rojo – a combination of Ancho and Guajillo chiles, tomatoes, nuts, sesame seeds, and that special ingredient, chocolate (which should accompany the chiles in the sauce, not over-take the sauce completely). 

It took a little searching, but I finally came across an Emeril Lagasse recipe from Food Network that looked like something I would make.  The ingredient list is long, as was the preparation, but I trusted that the pay-off would come in an authentic tasting full-of-flavor sauce.

I was right.

The original recipe is combined with a tequila marinated chicken.  I wasn’t that fond of the chicken when I made it, but the mole seemed just about perfect. 

One thing I found that I really liked about the recipe is that it is a two step process.  You spend a good bit of time in the first step roasting, charring, and toasting various ingredients, blending them all together in a food processor, then simmering for an hour to make what is called a mole paste.  Then in the second step, you only use a cup of the mole paste, about five minutes and a few other ingredients to make the finished sauce.  I ended up freezing the rest of the mole paste in one cup containers to pull out to make more sauce in small batches at later dates.  It’s a time investment up front that has a huge flavor pay-off in the form of a easy to throw together and quick sauce.

As I’ve had this culinary wonder sitting around, I have added it to just about everything:  tortilla soup, chili,  and chicken and rice just to name a few off the top of my head.  It has added a depth of flavor to each dish that I had not achieved before. 

And you would not believe what it can do for a hamburger along with a couple of onion rings….
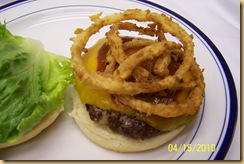
100_7979100_7981 

Oh, the YUM!

I had to make a very few alterations to the recipe based upon ingredients I could easily find at my local grocery store and my own preferences.  So here it is (and, as always, it can also be found on my recipe blog):

Mexican Mole Sauce
Adapted from this recipe from Food Network

Ingredients:

Mole Paste:
2 large tomatoes
1 medium onion, peeled and cut into 1-inch chunks
10 cloves garlic, unpeeled
15 ancho chiles, stems removed and seeded (reserve seeds)
1/4 cup sesame seeds
1 tablespoon black peppercorns
1 stick cinnamon
4 whole cloves
1/4 cup fresh Mexican oregano leaves, or 2 teaspoons dried
1/4 cup fresh thyme leaves, or 2 teaspoons dried
1/4 cup roasted almonds
1/4 cup shelled roasted (unsalted) peanuts
1/4 cup raisins 
1 cup chicken stock, hot
3 tablespoons vegetable oil
4 ounces Mexican chocolate, chopped

Finished Mole Sauce:
1 1/2 tablespoons vegetable oil
1 (14-ounce) can tomato puree
1 cup mole paste 
1 cup chicken stock
1/4 teaspoon salt
1 ounce Mexican chocolate, chopped

To make the mole paste, preheat the broiler to 500 degrees F

Place tomatoes, onion, and garlic cloves on a parchment lined baking sheet and broil until slightly caramelized around the edges, about 10 minutes. Remove from the oven and transfer the garlic to a small plate to cool. Turn the tomatoes and onions so that the uncooked sides are up. Return to the broiler until slightly caramelized on the second side, about 6 to 8 minutes. Remove from the oven and set aside to cool.

In a large skillet over high heat, toast the chiles on all sides until lightly browned and fragrant, just for a couple of minutes. Do not allow to burn. Transfer to a medium bowl, cover with hot water and allow to sit until softened, about 30 minutes. In the same skillet, combine the sesame seeds and reserved chile seeds and toast until light brown and fragrant. Transfer to a bowl and set aside. Add the peppercorns, cinnamon stick, cloves, oregano and thyme to the hot skillet and "toast" for a few seconds, just until their perfume is released. Transfer to the bowl with the sesame seeds.

When cool enough to handle, peel the garlic cloves and add these, along with the charred tomatoes and onion, to the bowl of a food processor. Add the seeds and spices. Drain the liquid off of the chiles and add these to the processor as well as the roasted nuts and raisins, and 1 cup of chicken stock.  Puree the mixture until very smooth and thick, scraping down the sides of the blender frequently.

In a large deep pot, heat 3 tablespoons of the vegetable oil until very hot. Carefully pour the pureed mixture into the pot (be careful - it will splatter) and bring the mixture to a boil. Lower the heat so that the mixture simmers, and add 4 ounces of chopped chocolate to the pot. Cover and cook, stirring frequently, for about 1 hour, or until the mole paste is very thick and flavorful. At this point you should have about 3 1/2 cups of mole paste.

You can leave the paste rough with all the seeds and pieces, or you can strain it through a fine mesh strainer.  I strain about half of the paste and mix it back in with the rough.  This gives a nice in-between texture to the finished sauce.

You will use 1 cup to make the Mole sauce  Reserve the remaining paste for another use.

(The mole paste will keep for at least 6 months, refrigerated, or up to 1 year if frozen.  I freeze in 1 cup containers for ease of thawing for use.)

To make the sauce, heat the remaining 1 1/2 tablespoons of oil in a large saucepan over medium-high heat until very hot. Add the tomato puree and cook for 2 minutes, stirring frequently. Add 1 cup mole paste and the remaining 1 to 1 1/2 cups of chicken stock and stir to combine well. Cook for 3 to 4 minutes, until the mixture is a nice sauce consistency. Add the remaining 1/2-ounce of Mexican chocolate and the salt and cook another 2 minutes, or until the chocolate is melted and the sauce is thick, smooth and flavorful.

100_7977

You may look at this recipe and say “15 chiles and 10 cloves of garlic?!? There’s no way I can eat that!”  Be assured that this sauce is not hot.  Nor does the garlic overpower it.  It is mellow and subtle with many layers to the flavor.

Enjoy this Mexican culinary wonder!  I know I have.

In this post:
Mexican Mole Sauce
Chili
Mole Chicken and Rice
Tortilla Soup

~~~~~~~~~~

I am linking this post up to Lisa’s weekly round up of chocolate recipes at Stop and Smell the Chocolates.  Go check out other chocolate recipes at her blog each Chocolate Friday.

Friday, April 9, 2010

Buttermilk Pie {Foodie Friday}

As I began to think through my Easter menu last week, I thought I had a dessert all picked out.  I was going to make bread pudding out of the Panetone bread that I was making for my Bread Baker’s Apprentice challenge (no, I haven’t done a post for that bread yet… I’m still catching up on the blog posts). 

But then I saw a recipe on my computer and my mind kept coming back to it.  Once I got it on my mind, there was no turning back to Panetone bread pudding.

Nana’s Buttermilk Pie.

If there is anything that speaks love to this Texan’s heart it’s pie.  I’ve written about pie before.  You might remember this post from almost a year ago where I explained that the proper way to say this word is to draw it out like “piiiih.” 

But back to Nana’s Buttermilk Pie.

Actually I mostly remember having Buttermilk Pie at my Aunt Mae’s house.  Aunt Mae was my Nana’s sister and just a dear sweet precious lady.  Buttermilk pie reminds me of family gatherings and being at my Aunt Mae’s house. 

So I looked at the recipe that I had written down from my Nana before she died a few years ago and I compared it to one that a friend gave me recently.  There was one big difference.  The recipe my friend gave me included flour in the custard mixture whereas Nana’s did not.  I wondered why.

My culinary curiosity got the better of me so I began to search the knower of all knowledge… my friend Google.  Every recipe on the internet that I came across had anywhere from 1/4 cup to 1 teaspoon of flour mixed in the buttermilk and egg custard.  One recipe, from a very well known tv food personality, even used 1/2 cup of Bisquick. 

Something seemed wrong to me.  I began to ask: What purpose does it serve?  Is it merely a thickening agent?  Why doesn’t Nana’s call for flour?  Will flour make it better?

I wanted answers.  Real answers.

Then I remembered.  I got a book for Christmas that should have my answers. 

Do you remember way back when I posted a kitchen wish list of sorts?  It included several books; one of which was On Food and Cooking: The Science and Lore of the Kitchen by Harold McGee.  Well, I was given this book by my father-in-law for Christmas.  It’s not really the kind of book you just sit down and read cover to cover – as if I do that with just about any book on any kind of regular basis.  It’s almost more like a textbook from college.  But it’s a wonderful reference for situations just like this.  So I pulled it off of my bookshelf and this is what I found:

“Flour or cornstarch can protect against curdling in custards and creams, even if they’re cooked quickly over direct heat and actually boil.”

The next paragraph states the following:

“A full tablespoon/8g of flour per cup/250ml liquid (or 2 teaspoons/5g pure starch in the form of cornstarch or arrowroot) is required to prevent curdling.  The disadvantage is that this proportion of starch also turns a creamily smooth dish into a coarser, thicker one, and diminishes its flavor.”

So, I felt that gave me my answer.  The flour in the recipe had been used to stabilize the custard and probably to thicken it a little.  But there was potentially a flavor and texture trade-off.  And you know, I’m all about the flavor and texture.  So I decided that if no flour was good enough for Nana, it was good enough for me.

We were going flourless.

The results?  A light custard pie that was smooth and so refreshing. 

Buttermilk Pie Whole

 Buttermilk Pie Slice

I could eat several pieces and it not ever feel heavy.  Not that I did…. necessarily.  But IF I did ever do such a thing as eat more than one piece, it WOULDN’T feel heavy.  THAT’s what I meant to say.

Right.

The neat part is that in my research on the internet, I found some interesting things about Buttermilk Pie.  Like this page that tells how popular it is all across the South, but especially in Texas.  “In West Texas—where there’s not always enough fruit for fruit pies—buttermilk pie is a classic dessert.”  If you’ve ever been to West Texas, you know that there is truth to there not always being a lot of fruit.  There’s not a lot of anything.  Period.  But there are cows (for buttermilk) and chickens (for eggs).  So this statement makes complete sense. 

I also found several variations with different flavors accompanying the buttermilk and egg custard.  Like lemon or nutmeg.  As I looked at my Nana’s simple recipe the only extra flavor I chose to add was vanilla.  Because I honestly can’t seem to bake without using vanilla.

So, without further ado….

Nana’s Buttermilk Pie

3 eggs
1 ½ cup sugar
6 tablespoons (¾ stick) butter (melted)
¾ cup buttermilk
¼ teaspoon salt
1 teaspoon vanilla
1 - 9” pie crust (plated but unbaked)

Preheat oven to 350 ºF.

Cream together eggs & sugar using the paddle attachment of a stand mixer. Drizzle in melted butter & mix well.  Add buttermilk, salt and vanilla. Pour into an unbaked pie shell.  Bake @ 350  for about 40-45 minutes or until set.  Cool completely.  It is best when made ahead of time and refrigerated to allow the custard to really set up.  Serve either cold from the refrigerator or at a cool room temperature. 

Buttermilk Pie Strawberries

The recipe with more in depth instructions and photos can also be found at WayMoreHomemade – The Recipes in this post.

Other posts you might like:
Friends, Farmer’s Markets and Piiih

Friday, March 5, 2010

100th Day of School Snack Mix {Foodie Friday}

Any parent of a pre-school or grammar school child is well versed in the 100th day of school celebration.  There are many ways to celebrate such a momentous day in a young child’s life.  One way is with the 100th Day of School Snack Mix.

The idea is that everyone counts out and brings 100 of a small snack type item and it all gets mixed together for a snack mix.  Such a concoction defies all culinary rules and norms and borders on the “suicide” drink mix that 6th grade boys are known for at the soda fountain at the local Cici’s Pizza.

Nathan’s 100th day of school was several weeks ago and his 100 items were Alpha-Bits cereal.  Following is the “recipe” for his class’s 100th Day of School Snack Mix.

100_7269

Nathan’s Pre-K 100th Day of School Snack Mix

100 of each:

Square pretzels
Apple Jacks cereal
Cocoa Puffs cereal
Vanilla wafers
Cookie Crisp cereal
Cheetos
Trix Cereal
Golden Grahams cereal
Skittles candies
M&M’s candies
Pretzel sticks

Now don’t you wish they would package THAT and sell it in bulk.  Yummy!

What kinds of interesting things have you seen in a 100th Day of School Snack Mix?

Thursday, December 17, 2009

Cupcake Advent Wreath

I read a post last week over at Bakers Banter, the King Arthur Flour blog in which the writer made a Cupcake Menorah.  I found it to be a neat idea, but not being Jewish, it didn’t really apply to me. 

Or did it?

Then I thought, I could totally do that as an Advent Wreath.  I mean, what a great way to make the Advent Candle lighting a little exciting for the kids.  Our church lights Advent candles every Sunday in December, but without much explanation of why.  I wonder if half the people even know the symbolism of the candles.  So, I decided that this was a good way for us to practice this tradition in our own home putting our own little twist on it while being able to teach our children the principles behind the symbolism of each of the candles.

But just as the Cupcake Menorah presents challenges on a practical level (the need to completely burn the candles and ending up with a horrible waxy mess on top of your cupcakes as a result), so did the Advent Wreath.  For instance, usually when an Advent Wreath and candles are lit at a church, it is done over a period of 4 weeks (i.e. one each Sunday of Advent totaling 4 weeks) which would make for some awfully stale and possibly moldy cupcakes at the end of it all.

And what is the use of cupcakes if you are not able to eat them because of wax, staleness or mold

Seriously.

If a cupcake is meant for anything, it should be to be eaten.

So I decided to alter our Advent candle lighting schedule.  We will be doing our wreath and candle lighting beginning on December 21st and we will do a reading and candle lighting at home each remaining night (daily for 4 days instead of weekly) until the 4th candle is lit on December 24th, Christmas Eve.

This is the Advent reading guide that we will be using:


Advent Candle Readings -

Normally the 5th candle in the center of the wreath, the Christ candle, would be lit on Christmas Day, but since we have our Happy Birthday Jesus cake tradition, I figure we’ll just stick with that instead.

And then there are the aesthetics of the whole thing.  Traditionally, the candles themselves are either purple, rose or white in color.  Well, to be honest, those colors just don’t go with my red and green Christmas decor and I don’t feel the need to be all that traditional about colors when I’m making the thing out of cupcakes. 

And, to help address the dripping wax issue, I used tea-lights instead of tapers.

Now, I am certainly no expert cupcake decorator, so I am sure that other people could make this look a LOT cuter.  But, here’s what I did:

I made Red Velvet cupcakes in red foil cupcake liners.  I substituted butter for the Crisco called for in this recipe and may have over-filled my cupcake liners so all my cupcakes came out looking like flattened mushrooms.  But they had a nice light texture and tasted delicious.

   100_6995       

I topped them with piped cream cheese icing.

 100_7000

I garnished them with green sprinkles and some extra red sprinkles on the ones that would hold the candles.

 100_7001100_7003

And lastly I placed the candles in the appropriate cupcakes, filled in a little bead of piped icing right around the edge of the candle and finished off with a few more red sprinkles.

100_7006 100_7007

We totally plan to eat as we go through the advent readings so this is the only pretty picture there will be of our wreath.

100_7017

100_7013

100_7015

I look forward to this being a new tradition in our family as we celebrate the coming of our Lord Jesus Christ to the earth.


Friday, December 11, 2009

Hot Chocolate Mix and Zesty Southwestern Peanut Brittle {Homemade gift ideas}

I assume you’ve noticed that we’re having quite the “homemade” Christmas around our house this year and I am trying to share with you as many ideas as I can.  One thing you can always be certain of with me, though.  Some of my gifts every year will come from my kitchen.  I have some old favorites that I have made year after year, but this year I wanted to try some new things.

In preparation for my Christmas gift cooking, I recently purchased a big bag of store brand granulated sugar because, you know, the pennies must be pinched.  I later told my husband to knock me up-side the head if I ever make such a mistake again.  This particular store brand of sugar is full of big lumps and I am having to sift it before each use and throw out a lot of unusable sugar because of all the lumps.  That’s not a very economical use of sugar, wouldn’t you agree?

Enter C&H Sugar to save the day.  Just when I didn’t know how I was going to get the cooking done when I needed to for Christmas gifts, C&H came along with a beautiful, high quality product that gives me perfect results. 

And do you know what I found out?  C&H Sugar has a great website as a resource for recipe and gift ideas.  It was on that website that I got some ideas for a few gifts that I will be giving.

I found that I had some of these darling jars in my closet that were just begging to have something delicious placed in them.  Being as cold as it’s been this fall, Hot Chocolate Mix seemed perfect. 

100_6945

Making this is so easy, it’s ridiculous.  Here’s what you need:

1 3/4 cups nonfat dry milk powder
3/4 cup unsweetened cocoa powder (I used dark cocoa powder)
1/2 cup firmly packed C&H Brown Sugar
1/4 cup C&H Pure Cane Sugar

Instructions:

Layer ingredients carefully in a quart jar. Or if you’re like me, you might simply chose to go ahead and mix the ingredients before placing them in a jar (and my jars are smaller than a quart – they are 2 cups).   Add mini marshmallows or chocolate chips to fill additional room and add a sweet treat to your mix.  Seal tightly. To reconstitute, mix ingredients well. For a single serving, add 8 oz freshly boiled water to 1/2 cup mix in mug. Stir until completely dissolved.

But here’s what I’m really excited about.  In perusing the list of recipes on the C&H Sugar website, I came across this recipe for Zesty Southwestern Peanut Brittle.  Now, being from Texas, I just can’t pass up a “Zesty” and “Southwestern” twist to an old favorite like Peanut Brittle.  And since I had never made Peanut Brittle before, I knew I had found my new thing to try for this year. 

I was a little intimidated by the thought of making candy.  However, I found this recipe to be very easy and pretty quick to make.

Zesty Southwestern Peanut Brittle

Makes:  about 1-1/2 pounds peanut brittle

A bit of Cayenne Pepper gives this classic candy a subtle kick.

100_6935

Ingredients:

1/2 cup water
1 cup corn syrup, light
2 cups C&H Pure Cane Granulated Sugar
1/4 cup butter
1/2 tsp. cayenne pepper
1/2 tsp. salt
2 cups peanuts, raw shelled (I used dry roasted)
1-1/2 tsp. baking soda

Instructions:

Combine first six ingredients in a large saucepan and cook over medium-high heat, stirring occasionally, until the mixture reaches 275°F on a candy thermometer. Add peanuts (this will lower the temperature a bit). Continue to cook over medium-high heat, stirring frequently, until the mixture reaches 295°F. Remove from heat and stir in the baking soda. Pour onto a heavily buttered cookie sheet. For very thin brittle, stretch candy with a fork before it cools and hardens (or split the recipe and pour into 2 cookie sheets).
Credit: Recipe Developed and Tested By Contest Winner Gregory Ware

100_6956

100_6957100_6954

I divided the peanut brittle into bags of about 4 ounces each and that gave me 9 bags.  That’s NINE small gifts from one batch of peanut brittle that probably only cost a couple of dollars to make.  These will be perfect for giving to Sunday School teachers and the aides and administrators at the school.

So thank you to C&H Sugar for the wonderful gift and recipe ideas on your website and also for sponsoring this post with a $20 gift card to help out with the expenses of my Peanut Brittle experiment.  I might not have tried it without you.

***

I have linked this post to Chocolate Friday hosted by Lisa at Stop and Smell the Chocolates.  Join us over there for more chocolate recipes!

Friday, November 20, 2009

Everything Cookies & Brownies {Cookbook Review}

EverythingCookiesBrowniesCookbook

When my friend, Marye, asked me to review her cookbook I was thrilled to do so.  I got it in the mail and couldn’t wait to get out the flour and my trusty KitchenAid stand mixer and try out a few recipes.

But first, a little background on the author.  I met Marye through Twitter (@maryeaudet) this past spring.  She is a wonderful resource for bouncing food and flavor ideas around with (and I might add an incredible source of Christian encouragement).  She has eight kids in a wide range of ages and lives in an old restored farmhouse in the Dallas/Fort Worth area.  She does a lot of food writing and blogs at Baking Delights on a regular basis as well as other places as listed on her home page.

The impression I get from this book is that her whole approach comes from her own experience as a mom.  In other words, ladies, this is a practical cookbook written by a mom as a wonderful resource for moms. 

“Don’t wait for a rainy day to make some cookies.  Choose a recipe, gather your family together, and enjoy some quality time while creating a mouth-watering snack.”

The cookbook starts off with a chapter of “Cookie Baking Basics” which includes a lot of handy tips (i.e. substituting non-caloric sweeteners, what to do when using a glass pan instead of metal and cookie storage tips) and interesting facts as well.  For instance, did you know that “the very first decorated cookies in history are thought to be from Switzerland”? 

“Knowing how to store and ship cookies makes it easy to send a quick gift or have a cozy snack whenever you want.  Keep the cookie jar full and the family happy by using your freezer to your advantage.”

The remaining chapters (2-16) break down all of the 300 (yes, I said 300) cookie and bar recipes into genres to make them a little easier to find.  Just to give you an idea, some of the chapter titles are All Kinds of Chips, Easy Drop Cookies, Brownies and Bars, No-Bake Cookies, and Kids Can Bake!  There is even an entire chapter dedicated to Cookies for Special Needs (such gluten free and egg/dairy free) which is a great resource for that treat you have to fix for your child’s class when there is that one child with an egg allergy. 

“Storing Gluten-free Treats:  Cookies that are baked without gluten do not have the same storage times as regular cookies.  In fact, gluten-free items are at their best still warm from the oven.  Plan to eat the cookies immediately, or place in the freezer for longer storage.  Warm the cookies a few minutes in the oven and they will taste as fresh as if they were just baked.”

Overall it is a comprehensive resource for cookies and brownies.  I mean, I was amazed and honestly, a little overwhelmed at how this book almost literally takes you through cookies from A to Z.  It is a nice mix of standard recipes that you would recognize, new twists on old standards and new/different things you may have never heard of.  Everything from the most common Chocolate Chip Cookie that’s good comfort food on a rainy afternoon to the specialty Rose  Crackle Cookie that would be the perfect addition to any tea or bridal shower. 

Recipes are laid out to be simple  and concise.  There’s not a lot of fluff.  They are clear and to the point.  It’s pretty no-frills and does not have pictures with the recipes, but just gets right to the point.  Each recipe also includes tips and usually ingredient substitution/ addition/subtraction ideas.  The book is paperback and lies open nicely on your countertop to easily refer back to the recipe as you cook.

In general the ingredient lists are fairly common, but there are some very unique recipe names that would call for some specialty ingredients.  For example you would need loose leave Chai Tea Blend for the Russian Chai Tea Cakes, and you would need mascarpone cheese for the Tiramisu Brownies.  But I think if you were making some of those more specialty recipes, you’d be ready to get those special ingredients. 

Now, I’d like to show you some of my results from the Everything Cookies & Brownies cookbook.

First up, Pecan Pie Bars. 

Now, if you have read this blog for any length of time, you know that I am not a big nut fan.  However, my daddy is.  And now that my daddy is back in these United States, I am excited to get to cook for him again.  So, I made these Pecan Pie Bars for him.  I also figured that with his experience with pecan pie, that he would be a good judge of how they turned out. 

100_6532

From what I could tell, I thought they turned out gorgeous.  And easy… Oh WOW!  Just see for yourself.  Marye has granted me permission to give you this recipe.

Pecan Pie Bars
(yields 36 bars)

Ingredients:

Crust:
3 cups all-purpose flour
1/2 cup white sugar
1/2 teaspoon salt
1 cup unsalted butter (cool room temperature)

Topping:
1 1/2 cups light corn syrup
4 eggs
3/4 cup white sugar
3/4 cup brown sugar
1/4 cup unsalted butter, melted
1 1/2 teaspoons vanilla
3 cups chopped pecans

1.  Preheat oven to 350 F.  Line 10” x 15” jelly roll pan with parchment, allowing it to overhand sides and ends slightly.

2.  Stir together flour, 1/2 cup sugar and salt.  Cut in 1 cup butter until mixture resembles coarse crumbs.  Press firmly into the pan.

100_65313.  Bake 20 minutes

4.  Mix together corn syrup, eggs, remaining sugars, melted butter and vanilla; whisk until smooth.  Stir in pecans.  Pour over hot crust.

5.  Bake 25 minutes, or until set.  Cool completely before cutting into bars.

**You can sprinkle 1 cup of chocolate chips over the crust before pouring on the topping for a chocolaty variation.**

Do you see how easy that is???

This is one of those recipes that you can make it once and from then on just be able to look at the ingredient list and go without looking at the directions hardly ever again.  There is nothing better, in my opinion, than a completely from scratch, homemade recipe that you can almost do in your sleep it’s so easy.  And this is one of those. 100_6535

And my daddy?  He tried one and immediately hid them from anyone’s sight.  So, I’d say he liked them pretty well.  And they are more portable than regular pecan pie so he took them out to the deer lease with him the following week where, from what I gather, they were a big hit as well.

I have also made the Chocolate Toffee Cookies.  Now, these are a little more involved as they require some refrigeration.  And certainly these are cookies you make for a little bit of a special occasion when you’re willing to spend a little on ingredients.  But oh, heavens.  SO worth the 1 pound (uh-huh… 1 POUND) of bittersweet chocolate.  They are like a rich brownie in cookie form with little pockets of toffee.  Also known as “heaven in edible form.”

100_6609

Overall I am impressed with the Everything Cookies & Brownies cookbook.  From the easy to read recipes to all the tips sprinkled throughout the entire book about everything from ingredients to methods.  It’s a comprehensive guide to cookies and I believe it would be well used in your kitchen.  I know it will be in mine.

Everything Cookies & Brownies can be purchased through Amazon.

Friday, October 30, 2009

Foodie Friday: Pumpkin Cake Truffles {Flavor of the Month}

bakeat350_flavor_large

For this round of Flavor of the Month (hosted by Bridget at Bake at 350), our challenge was pumpkin.

Now, it is my understanding that our creation can even just be in the shape of the challenge and not necessarily the “flavor” of it.  Well, I took liberty in that this month since I don’t normally make a lot of pumpkin flavored things.  I made a pumpkin pie once… none of us were all that crazy about it. 

I know, I know… “That’s just crazy talk.”

But it’s true.

So I present to you my pumpkin shaped and decorated, but not necessarily flavored, cake truffles. 

100_6517

100_6511

Now, I think I’ve already made it clear that I did not use a pumpkin flavored cake inside these.  What flavor did I use?  Well, I’m glad you asked.  Inside of each of these beauties is Orange Vanilla Spice Cake held together by a Cinnamon Browned Butter Icing.  Click on the names and it will shoot you over to the recipes on the recipe blog.

I learned a couple of things in the process of making these truffles.  Lesson #1: I learned that I don’t have time to make cake truffles very often.  I just don’t.

Lesson #2: Red candy chips are really powerful, color wise.  You see, there were no orange candy chips on the day I went to Hobby Lobby so I used my mad Kindergarten level science skilz and decided that I should be able to make the color I wanted by using the yellow and the red chips that were available.  So I measured equal amounts of each and melted them.

100_6468 But instead of orange, I ended up with….

100_6469 just a really funky light reddish color.

So, I pulled out my gel icing colors and found my yellow and began to add it in.  The color got better and was just about right when all of the sudden…

100_6472 100_6471

The whole thing just clumped up and solidified on me.  Lesson #3: You can only add so much gel food coloring to melted candy coating stuff before it revolts.  (Lesson #3a: I am seriously considering whether this candy stuff is something I want to put into my body if it has that kind of a chemical reaction to a little food coloring.  I’m just sayin’.)

So I started over and used much less red and finally got the right color.  That whole process was way harder that it had to be.  Lesson #4: Hold out and look for the correct color of candy chips instead of trying to mix your own.

And once I had established a pattern of how to decorate the pumpkins, I discovered another lesson.  Lesson #5: Dipping the cake balls in the melted candy stuff goes a lot better when the bowl is full and the candy is freshly melted & warm.  Once the level gets too low and the candy begins to thicken from cooling off, you get pumpkins that look like they came from Chernobyl.

100_6495

So… nuts and bolts.  How did I make them? 

For the cake balls, crumble up your cake and add enough icing so that the crumbled up cake sticks together like a rough dough.  Then for uniform size, use a scoop (like an ice cream scoop) to measure out your cake mixture and roll it in to a ball.  Cover and refrigerate.  (There are also instructions at Bakerella and The Pioneer Woman Cooks.)

Put half of a pretzel stick in the top of each cake ball to act as the stem.  Coat the cake ball in the melted orange candy coating stuff.  While it is still wet, use a toothpick to draw the stripes going down the pumpkin then set aside to harden.  Decorate with butter cream icing using the #67 decorating tip for the leaves and the #1 decorating tip for the stringy things.  See the picture album below.

And for heaven’s sake, let your kids give it a try…

100_6501

Letting Sarah get her hands on my Pumpkin Cake Truffles stressed me out immeasurably, but it’s something I must make myself do.  And, she enjoyed it.

Happy Halloween, y’all!


Recipes in this post:
Orange Vanilla Spice Cake
Cinnamon Browned Butter Icing