Search This Blog

Showing posts with label Works for Me Wednesday. Show all posts

Wednesday, June 30, 2010

Picking/selling blueberries works for us

I mentioned in this post last week that one thing that works for us is to have our kids earn some money toward their summer camps and activities. Specifically right now, that is our daughter who is the only one really old enough to participate in camp. This week, I wanted to share with you one of the things that we did this year that really worked well for us.

We went to a pick your own blueberry farm to pick blueberries.  We then packaged them and sold them for $3/pint.

100_8507

What I liked about it was that Sarah had to really get out there and do some physical work to have the blueberries to sell.  I also liked that it was an opportunity for her to earn her money from people other than her mom & dad.  And blueberries are so easy to pick that if you get out there early in the morning, it’s actually quite pleasant.

100_8503

The downside was the cost.  It’s a two hour drive for us to get out to the area of East Texas where the blueberries are good.  We were already planning to go out to visit family in that area, so we really didn’t count the additional cost of gas, but that would be a factor otherwise.  And there is the time investment of four hours in the car plus at least two hours picking berries. 

                           100_8504100_8505

But the conclusion I came to was that it was worth the cost.  It was worth my investment of time to help my daughter learn that we have to work for the things we want to do.

We ended up picking two big gallon buckets worth between the kids, my mom and I on the first trip.  Sarah and I went back the following weekend and picked another big gallon bucket.  We got about 9 pints out of each bucket.  I sent out an email or two and posted a message on Facebook.  Between all my friends online and at church that saw my messages, we sold every bit of them quickly.  At $3/pint, we had her money very quickly.

100_8508

Again, I admit that I cannot take credit for this idea. Credit is totally due to my sister.  She has done this for years with her boys but this is the first year for us.

I do believe we’ll be doing it again.

~~~~~~~~~~~~~

This post is linked up to Works for me Wednesday over at We Are THAT Family.  For more tips, visit Kristen at We Are THAT Family and click on some of the links.

Tuesday, June 22, 2010

Working for it

Summer can be a fun and quite expensive time.  There are the wonderful lazy days that the kids just get to stay at home and go swimming and watch movies with the babysitter.  And there is also no shortage of activities for which we must pay.  And pay.  And pay.

There are water parks, movie theaters, sports camps, church camp, ranch camp… you get the idea.

Now, I believe in giving my kids the opportunity to have many different experiences while they are under my roof.  I believe every dollar I spend on various camps is an investment in who they will some day become.  I love giving them the opportunity to learn a little more about a specific sport for a week.  I love the fun an intensity of church camp and with as many wonderful experiences as I had at church camp, I love sharing that with them.  I also think that going out to a ranch for a week of camp is important for my city born and bred kids in order to get them out of the city environment for a while and allow them to do some good old fashioned work and have fun while doing it.

BUT.

As much as I believe in all of these things, it gets really expensive.

From the first time Sarah when to a camp where she spent the night, she was responsible to earn a portion of the money to pay for that camp.  The amount she has to earn is pretty small ($50 + spending money).  And being so young, there is only so much she can do to earn money and most of it is still earning it from us by doing chores around the house.  But we are beginning to instill the idea of working for it.

You see, as much as I believe that the experience of summer camps is an investment in my kids’ futures on my part, I want my kids to know that going to camp is a privilege.  Not a right.  A PRI-VI-LEGE.  So many in our society feel so entitled these days and don’t realize that much of what we have is not a right but a privilege.  I really want to instill in my children early on the difference and that sometimes we have to work for it. 

And we appreciate it much more when we do work for it, don’t we? 

I know I always do.

~~~~~~~~~~~~~

Next week I plan to share one of the extra things we’ve done to earn some of the cash.  Stay tuned.

~~~~~~~~~~~~~

This post is part of the Works For Me Wednesday blog carnival over at We Are THAT Family.  Hop on over there to get more practical tips from a lot of great bloggers.

Wednesday, March 3, 2010

No-Prep In Car Entertainment {Works for me…}

Let’s say, hypothetically of course, that you go out to dinner on a Saturday evening.  And perhaps the restaurant you go to is along a very busy six lane (three in each direction) road.

You may be in a situation where your husband is a car guy (buys and sells cars and is meticulous about car maintenance) and drove a new car to dinner.  He might want you to drive it home to see how it feels.  Hypothetically speaking, of course.

Not that I would know from experience, but in this situation, you could discover the car hesitating as you press the accelerator and it might eventually die as you try to pull away from a traffic light while you are positioned in the middle lane with cars speeding past you on either side.  In this situation the following conversation may happen:

“Um, honey, the fuel light is on,” you say as you look at the instrument panel.

“No. That’s not possible.  It showed half a tank on the way here.  I mean, the fuel light came on at first, but it went off as the needle went up.”

“Well, it is possible because it’s on now and the car won’t go.”

So let’s say you’re in this situation.  The police might be passing by and stop to lend a hand.  Your husband tells the nice police officer that you *may* have run out of gas while being sure to mention that there *may* or *may not* be a gas gauge problem.  The nice police officer will probably have to radio for another officer to bring a gas can.

And so you have to wait.

Believe it or not, I’m getting to my point.

Knowing that you have kids in the car and not knowing how long it will take the other officer to arrive with gas reinforcements, you find yourself in a situation for which you were not prepared:  Sitting in the middle of the road with no place to go with kids getting antsy in the car.

What do you do?

If I were in that situation (not that I necessarily ever have been), I would start a story around the circle.  I begin telling a story and we go around the circle and each person adds a little bit to the story.  You just let it take whatever twist the next person adds to it.  So you might start off the story with, “One night, a family was stuck in the middle of the road in a car that wouldn’t start…”  The story will likely end with something like, “… and the dragon went to sleep.  And that’s the end.” 

I really do love telling stories around a circle.  It encourages our imaginations and helps develop speaking skills.  It’s great when trying to stay distracted in the car as well as around a campfire when trying to keep little hands away from said fire (not that I’ve ever been in that situation either).  But all in all, it’s a good idea to have in your back pocket for those times that you need a distraction when you are completely caught off guard and unprepared.

So, you know that hypothetical situation I described above, well, just to tie it up with a nice little bow, I’ll see if I can finish the story for you. 

When the other police officer arrives, you might look in your rear-view mirror and see that it is taking two police cars with lights on to get you going again and that everyone that is passing by is taking a really good look at you in the car.  And as you look in your rear-view mirror you would probably see one officer carrying a gas can to put gas in your car - your car-guy has never run out of gas before meticulous about car care husband’s car – in front of God and the whole world to see.  In this situation you might just start laughing hysterically. 

You might.

I’m just sayin’.

And in this case, you will be very glad that you didn’t have a beer with dinner because you are fully expecting the officer to say, “Ma’am, would you please step out of the car for a breathalyzer test?”

So once the police officer has put some gas in your car and you discover that with some gas the car does indeed start, he might suggest that you drive directly to the gas station just up the road and on the right. 

“Yes, sir,” is probably all you would be able to say in response.

But, if you ever find yourself in this situation, you now know how to keep yourself and your kids distracted and entertained with no preparation needed.

That’s what works for me…. again, hypothetically speaking, of course.

Go visit Shannon at Rocks in my Dryer who is hosting Works for me Wednesday for the next couple of weeks while we pray Kristen and her family through her trip to Africa with Compassion International.

Thursday, December 3, 2009

Charmed Bookmarks {Homemade Gift Idea}

I mentioned on Twitter yesterday that I was working on these charmed bookmarks yesterday to be some homemade Christmas gifts. Someone asked how I did it and I promised to take pictures and that I’d share with all of you.

This is so simple it’s not even funny.

What you’ll need:

Charms
Connector ring thingys (that’s a technical term)
Needle nose pliers (maybe)
Tape measure (optional)
Ribbon
Coordinating thread
Scissors
Sewing Machine


I found most of the supplies at Hobby Lobby. And when I was there, both ribbon and the charms were 50% off, making for some very cute, very inexpensive gifts.

The great thing is that these can be as simple or as ornate as you want. I like the simplicity of one charm, but you can use a string of them together or add beads as well if you like.

First attach the charm (or charms) to the little connector ring.

100_6872 100_6873

Measure out 12-15 inches of ribbon. Double that length and fold the ribbon in half.

100_6874 100_6875

Thread the ribbon through the connector ring of the charm until the charm is at the half way point. “Eyeball” or measure about 1 inch down from the fold.

100_6876 100_6877

Sew a short line at about that 1 inch point. I like to use a tight zig-zag stitch.

100_6878 100_6881

Make sure you cut the ends into a pretty angle cut.

100_6882

And you’re done.

100_6883

The idea is that the charm and ribbon will stick out from your Bible or book just a little.

100_6884

And with the ribbon being folded and stitched, multiple pages can be marked.

100_6886

100_6887

So there it is. Have fun!

****

Edited on 12/8/09:

This post was linked up for Works For Me Wednesday at We Are That Family.

Tuesday, October 27, 2009

Backpack Staging Area {Works for Me Wednesday}

This post might be more appropriately entitled, "This had better work for me or else I may just pull every last hair out of my head!" And if you know me or have seen my thick hair in person, you know that's a lot of hair.

I'm just sayin'.

If you have grade school aged children you know that the whole back pack thing after school can get out of hand really easily and we have battled it with our one grade schooler for the last three school years.

But now, with one that is also in Pre-K and headed full steam toward Kindergarten, I needed a solution to help us keep a handle on the back pack situation because it has been about to drive me crazy.

So this is what we came up with.


It is located in the hallway that leads out to the garage. However, it is tucked into a little cove that leads to the extra bedroom so that it's not all sticking out into the hallway and taking up walking space. But it is easily visible on the walk in form the garage which I hope will prompt them to use it.

They have the hooks for their backpacks and jackets and then the organizer up on top for their folders to go in each day. Hopefully this will also be a place that we can keep important school forms etc. that we need to deal with so that they do not get lost in the disaster known as my kitchen counter tops.


Like I said, this had better work. Because if it doesn't, I'll be having to change my profile picture. And it won't be pretty.

***

This post is part of the Works for me Wednesday carnival over at We Are That Family.

Wednesday, July 1, 2009

Works for Me... Italian Sausage Skewers

I posted a new recipe post over at the recipe blog today for Italian Sausage Skewers. It's an easy summer recipe that gives you an entire meal with meat and vegetables all at the same time.

Enjoy! And go visit We Are THAT Family for more summer recipe ideas.

Tuesday, June 23, 2009

Bread Machine Focaccia

Please welcome with me my friend Lisa from the blog Stop and Smell the Chocolates where she encourages us to slow down and enjoy the richness of life. While at her blog, you might have Tea for Two-sday. Or she may ask you, "Would you like chocolate with that?" She may just be a little silly or serious. You just never know. But I do know that Lisa is a sweet soul who loves Jesus, her family and chocolate - and probably in that order... maybe.


~~~


When I knew I would be writing a guest post for Donna, I thought it would make sense to write about food (though her blog is about so much more than that). She’s been showing all that beautiful bread lately, so it was on my mind! I happened across a bread machine cookbook in a thrift store a couple days ago and then I knew! I am too intimidated to make bread all the way from scratch - that is way more homemade than I am used to! But I have a bread machine and I do know how to use it - a little. So here is my little more homemade bread. :)

I decided to try making focaccia bread. It sounded a little easier, quite yummy, and the recipe called for fresh herbs - I have an abundance of fresh rosemary in the front yard. Fresh Herb Focaccia it is!

Hi bread machine! Long time, no see!


Got it all dusted off and then proceeded. I put the ingredients in the pan in the order listed.

Liquid Ingredients
1 cup, plus 2 tablespoons water
1 tablespoon olive oil

Dry Ingredients
3 cups bread flour
½ teaspoon salt
½ teaspoon sugar

Yeast
2 ¼ teaspoons Active dry yeast

I set the machine to the Dough setting. When it was done, I had to punch the dough down by shutting off the machine and restarting the kneading for just 60 seconds. Then I removed the dough and let rest for 5 minutes.


Then I had to do the hand-shaping: Sprinkle hands with flour. With fingertips, spread dough evenly into a 13x9x1 in. lightly oiled baking pan. Cover with a clean kitchen cloth. Let rise until doubled in height, about 30-60 minutes.

Almost done: Preheat oven to 400 F. Make light indentations with your fingertips in the surface of the risen dough. Brush with 2 tablespoons extra-virgin olive oil and sprinkle with up to 2 teaspoons coarse salt (kosher or sea salt) and fresh ground black pepper to taste. Add ¼ cup chopped fresh herbs, if desired. Bake on bottom rack of oven (oops - I missed that part!) for approximately 30-35 minutes, or until golden brown. Let cool in pan. Cut into 12 equal pieces and serve at room temp.


I have to say that this bread is yummy! My son already told me he wanted to eat the whole pan! And once hubby gets hold of it, I think I’ll have more requests to make bread.

Thanks Donna for inspiring me to step outside of my comfort zone and try to be a little more homemade!

Lisa @ Stop and Smell the Chocolates


You can also find Lisa blogging at her Healthy blog, Stop Eating all the Chocolates and on twitter @stop4chocolate.


Bread machine focaccia works for Lisa and I'm thinkin' it's gonna work for me. To find other works for me posts, visit Kristen at We Are THAT Family.

Tuesday, June 9, 2009

What I Learned/Works for Me... Marshmallow Fondant

Several weeks before the big dual birthday party for the kids, I began talking to them about birthday cakes. I told them we could either do one big cake or two separate ones. Lucky me, they chose separate.

I mean that, actually. I love the cake decorating process so it was twice the fun for me.

Sarah and I began talking about her cake. First she mentioned a Cinderella cake. (Meh.) Then she came up with wanting butterflies and flowers. I immediately came up with a design in my head. But the only way I could picture it was going to have to involve fondant.

Problem.

I’d never used fondant before.

But I was willing and excited to try. Seriously, how hard could it be?

So my mind was made up. I was going to be experimenting with fondant. I watched for Hobby Lobby to put out one of its 40% off coupons, bought Wilton fondant and asked a few fellow foodies to share any words of wisdom.

Then while on Twitter one day (I’m sure while I should have been working) I mentioned the cakes I was going to be working on. Someone asked me if I was using buttercream or fondant and I replied that I would be trying my hand at fondant. Then she mentioned having used marshmallow fondant recently and how much better it tasted.

I was intrigued. This I had not heard of before.

So I did as I’m prone to do. Research. I researched just a little bit and came across a posting on the Wilton forums that included a recipe. And here was the great thing…. I was going to be able to make this fondant that would taste better out of stuff already in my pantry and be able to take back the expensive purchased fondant. I was beyond excited about that prospect.

So here’s how to make it and some tips I picked up in my experience:

Marshmallow Fondant
(For in depth instructions and step by step pictures, visit the recipe on my recipe blog.)

Ingredients:

1 cup mini marshmallows (packed)
1 tablespoon water
1 ½ - 1 ¾ cups powdered sugar
Gel color

Method:

To measure the marshmallows, pack them down and put as many marshmallows as possible into the measuring cup. Place the marshmallows in a heatproof bowl; add the water and place in the microwave for 20-30 seconds or until the marshmallows begin to puff up. Remove from microwave and stir; it should be starting to get soupy. If you care to color the whole batch, add your color to the melted marshmallows at this point.

Sift and knead in the powdered sugar about ¼ - ½ cup at a time; first kneading with your spoonula/spatula and then with your hand but keeping it in the bowl. You will add at least 1 ¼ cups powdered sugar. Stop adding the sugar when you can form it into a ball in your hands dusted with a little bit of powdered sugar and it does not stick to them.


Working with the fondant:

I first ice my cake in similarly colored butter cream icing. I hated the idea of having a colored fondant with white butter cream between it and the cake.


When rolling it out, use your powdered sugar like you would flour when rolling out sugar cookies or pie pastry. Dust your counter top with the sugar and keep it well dusted so that it does not stick.

To transfer the fondant to the cake, roll it up on your rolling pin (I just used my wooden one - nothing special here), then unroll it over the cake and form it down over the cake using your sugared hands.


I had trouble at the bottom of my round cake with the fondant stretching out and creating these folds. It was easy to cover up with the rest of the decorating I was going to do. This is something that I think I will figure out with time and practice.


Don’t worry too much about there being powdered sugar on it after you have placed the fondant on your cake. When covered, the powdered sugar soaks on into the fondant and your color is left vibrant.

Keeping your finished cake covered keeps the fondant moist and tender. If you want it to dry, then leave the cake uncovered.

When you are all done, you'll need to MOP your floor. Powdered sugar will likely be everywhere.


Storage:

Store the fondant in a zip top baggie.


Overall Impressions:

This is definitely a better way to go than the purchased fondant. It tastes better and is easier on the wallet without a whole lot of effort. I personally much prefer spending less on something that one 3 year old at our party scraped off the cake and put entirely in her mouth than spending more on something that most kids would spit out.

I learned a lot and I learned that Marshmallow Fondant definitely works for me!

~~~~~

For other What I Learned... posts, go visit Musings of a Housewife.

For other Works for me Wednesday posts, go visit We are THAT Family.

Tuesday, June 2, 2009

Works for Me Wednesday: Summer Research Projects

This week's edition of Works for Me Wednesday is dedicated to beating the summer boredom. It's the "Mom, I'm bored" edition.

Let me give you a little background first.

In second grade every year at our school, the children do a research project about an African animal that is assigned to them. You may or may not remember, that Sarah did her project on the ostrich (you can see her project here).

Okay, a little more background.

Every summer at our school, the children are sent home with a form to fill out for summer reading. The children are supposed to read 10 books over the summer and turn the sheet back in the first week of the next school year.

SO, this summer, as a part of Sarah's summer reading, we are encouraging her to not only read fiction, which she loves, but we are having her read to learn something. She is going to be doing two smaller scale research projects this summer. One will be on a historical figure and one will be on an animal. Both will be her choice.
The historical figure she has chosen: George Washington, our first President.

The animal she has chosen: Beavers.

I still have a little prep work to do to get her research packet together, but I'm hoping that this summer will end with us all being a little more knowledgable about President Washington and beavers.

I hope this will "Work for Me." I guess I'll need to get back to you at the end of the summer and let you know.

If you would like to see more "Mom, I'm bored" tips, join us over at We are THAT Family for Works for Me Wednesday.

Tuesday, May 5, 2009

WFMW: The Frugal Tip Edition - Meal Planning/Designated Nights

During these, let's call them "interesting," economic times, many of us are finding it necessary to become a little more frugal in our living. In other words... where did all the money go?

Our family is feeling this pinch in a very real way right now, so believe me, I've been looking for ways to cut our budget drastically. One place I knew I needed to cut and be more careful was in our grocery budget. Another was our eating out habit.

I'll be honest. There are a lot of busy evenings that between working all day and with regular evening activities we don't have a lot of time at home for dinner. Most nights like this, we'd grab something out.

NO MORE! the budget says.

I have begun to take a cue from many of my frugal online friends and somewhat plan out meals for the week. But there were still those annoying nights when I don't get home until 5:30 and nights that we have just become accustomed to eating out.

Then a couple of weeks ago we instituted some weekly meals that we don't have to really think about. We designated certain meals to the same nights every week. They're fun and easy for nights that we really don't want to think or cook a whole lot.

So, any time you come by our house on a Tuesday evening, we'll be having Taco Tuesday.... and on any given Friday evening, it's Pizza Friday.

(The great thing about Pizza Friday is that I am using my sourdough starter to make the crusts ahead of time, freezing them, and we can pull out a few at a time... SUPER FRUGAL!)

It has really worked well for us the last few weeks. In fact, I noticed on Sunday that we had not eaten out all week long. That is a MAJOR step for us.

What frugal tips can you share with me?

Visit Kristen at We are THAT family for more frugal tips on this Works for me Wednesday. You might even want to share your own.

Tuesday, April 21, 2009

WFMW: Sourdough Success

Baking bread has long been an aspiration of mine. One that I felt that I lacked the time and energy to pursue with a job and young children. However, I recently decided that it was high time that I delved into this area of baking.

Right off the bat, I knew that I wanted to make sourdough bread. My mom used to make it when we were growing up but hasn't in years and years. So, I started reading and researching the way I tend to do. Then I jumped right in and made my starter.

What I learned was that this was not the easiest place to start in the realm of bread baking. I had loaf after loaf that I felt were failures due to what was probably a lazy starter. So I used it up to make some pizza crusts and then made a new starter.

I made one set of loaves using a little bit of commercial yeast in the recipe a couple of weeks ago. I was pretty excited about this.

Then, I found a post on the King Arthur Flour Baker's Banter blog that had me inspired to try it again with no commercial yeast help... just my starter, some water, flour, a little sugar and salt.

LOOK WHAT I DID!!!


So here's the schedule that is based on this post that worked for me:
Saturday
7 a.m. Remove starter from refrigerator.
8 a.m. Feed starter with 1 cup flour & 1/2 cup room temperature water.
6 p.m. Combine 1 cup starter with 1 1/2 cups water and 3 cups flour.
10 p.m. Refrigerate.
Sunday
9 a.m. Add 2 cups flour, 2 tbsp. sugar, and 2 tsp. salt. and knead for a sweet forever.
2 p.m. Shape loaves.
6 p.m. Bake at 350 - 400 F for 30 minutes or so.
7 p.m. Enjoy!

This is what worked for me. For more Works for me Wednesday posts, go visit Kristen at We Are THAT Family. She's starting to bake bread, also.

Tuesday, April 14, 2009

WFMW: Kitchen Tips - Clean Up

Imagine going from one cooking project to another; maybe you are cooking dinner or better yet, for a dinner party. You’ve cooked a main dish, sides, dessert, maybe even baked some bread. You finally finish and look at your kitchen.

Ugh.

I do it all the time. In fact, I am utterly incapable of cooking at all without messing up what seems to be every dish available.

But never fear - MY MAN is here.

I am incredibly fortunate to have a husband that cleans up for me after I cook. It’s kind of been our deal even since we were dating in college. I cook, he cleans up.

Yes, I’ll throw the occasional dish into the dishwasher. And maybe sometimes I’ll put one or two away. {gasp} But most of the time, it’s him doing the straightening up of the kitchen after dinner.

It’s even to the point now where he’s picky about how the dishwasher is loaded. If I’m going to put dishes into it, I’d better have enough to fill it and run it, because if he comes behind me to finish up, he’ll be almost emptying the whole thing just to move stuff around to how he likes it.

It’s really kind of cute.

So that’s what REALLY works for me… I cook – he cleans.

What a man! And ladies, he's all mine!


For more Works for Me posts, visit Kristen at We Are THAT Family.

Tuesday, March 31, 2009

WFMW: The Baby Years - Breastfeeding

Today’s edition of Works for Me Wednesday is a “Backwards” edition. What DOESN’T work kind of a thing. Well, since I did a series of posts recently that was a flashback to our baby years and what worked for us, this was the perfect opportunity to wrap it up with one big “What DIDN’T Work” for us post.

Oh, and my favorite male readers (I know you’re there), you may just want to move along today and pretend you never saw this post. I’m just sayin’.

Oh, and this turned really long… sorry.

Breastfeeding certainly didn’t work for me.

I tried, oh, yes I did. I tried hard. I pushed, I worked, I cried, I did everything a mom could do. But it didn’t work for us. And I’m writing this post not because I’m looking for you to tell me how I could have made it work, nor am I trying to start any kind of a breastfeeding debate, but because believe that there are others out there like me. Other moms who need to know that they aren’t alone.

I personally know some. And many, I believe, feel like they are less of a mom because they couldn’t make breastfeeding work. Well, I’m here to tell you, that I am so over that. I just wanted to share my story with you; maybe just as an eye-opener for some of you expectant moms, or just an encouragement to those of you who may have experienced the same thing or know someone who has.

I think I was led to believe that breastfeeding a baby was the most natural thing in the world… what God intended when he gave women breasts. And while I agree with that sentiment, I think that indoctrination caused me to believe that it should just be the easiest thing in the world.

WRONG!

First there was my daughter. I was a first time mom who only knew that both of her sisters had breastfed their babies (and one of them bf’ed triplets, no less). I did all the reading and classes and everything I could do to be prepared. Then, the day came. I gave birth by c-section (which was glorious, I might add) and as soon as we could after surgery, the lactation nurses were trying to help me get her to latch on. Nothing was happening partially because there was absolutely nothing there for her to get.

Fast forward 2 weeks. My milk didn’t come in until day 6 or so. We’ve been in and out of the lactation nurse’s office (otherwise known by my husband as the “breastfeeding Nazis”) several times a week. Feeding time was an ordeal with nipple shields, tubes & syringes to fill the shields with milk so that she would taste something, trying, and trying… then bottle feeding and pumping. On top of all of that she had a mild case of jaundice that just wouldn’t go away.

On the bright side, when I took a bottle of my pumped breast milk into the lactation nurses' office one day, I was told that I produced cream; not milk, cream.

Fast forward another 2 weeks. It’s been two more weeks of the same with no results. She just would not, could not latch on. I gave up. And felt like a failure.

But what a weight that was lifted once we made that decision. Such a simple decision to bottle feed my daughter formula opened us up to be able to see that we had a baby in our house; not just a mouth to try to feed a way that it didn’t want to eat. Looking back those first four weeks are a complete blur which is probably normal in some sense, but even more so since I didn’t feel the ability to just enjoy her. I was so focused on fixing the problem that I didn’t see my daughter. If I have any regrets of motherhood, that is one.

Then came my son. I was no longer that naive 1st time mom. I now knew that things can go wrong on so many levels. That things happen. That it might not work this time. But I was going to try because “breast is best,” right? So I found me some good lactation consultants in a neighboring city and visited with them before the baby was even born to discuss some of my concerns.

Again a c-section. This time, I got to hold him while I was in recovery unlike my daughter. The lactation nurse came in but I didn’t even try all that hard. I knew I wouldn’t have any milk. I mainly just held him and looked at him. And cried a little bit, too.

We had some of the same problems. I knew this time to ask for a pump right off the bat to help my milk to come in. It still didn’t come in until like day 5, but it was better. And he, like my daughter, had a mild case of jaundice.

We had some different problems as well. One of the lactation consultants in the hospital noticed that he had a short frenulum (aka was a little tongue tied). She suggested that might be a reason he was having trouble latching on. I remember so distinctly mentioning this to one of the pediatricians that came by and how curtly she dismissed my concern. I don’t remember what I said in return, but one of the nursery nurses and one of the lactation consultants came back by later because they had heard something about the altercation and I just bawled over it.

We did end up at an ENT’s office who clipped his frenulum. It was a 2 second thing, a drop of blood, and it was over. Now, in our case, it didn’t solve the problems, but now we knew that it would not cause any speech problems later and we were able to rule that out as a latching issue.

Again, this time, we were in and out of the lactation consultant’s office. These ladies were the best things ever! Not nearly the breastfeeding Nazis that the other ladies were. Their first priority was that the baby got fed. Period. Next, that my milk supply was okay. And last were any issues we were having with nursing. (Priorities I would suggest you look for in a lactation consultant, by the way.) I'm not saying that the group that I dealt with when I had my daughter didn't have these same priorities. What I'm saying is that if they did, they certainly were not verbalized and did not come across in any dealings I had with them.

And I learned a lot from them. For instance, the jaundice acts like Valium to the baby’s system and makes them sleepy, causing them (obviously) to want to sleep and not eat. They get the bilirubin out of their system by pooping (it’s a baby post, you knew poop was going to come into it somewhere). If they don’t get enough calories, they don’t poop and therefore the jaundice doesn’t go away and might even get worse, causing them to not want to eat… it’s a downward spiral.

So after 3 weeks of trying and mostly just pumping and bottle feeding him, that’s just what we decided to do. I’d pump on a fairly regular schedule and we’d bottle feed him breast milk. It was a great system and we did it for about 6 weeks. We could have gone longer, but we were headed on a long car trip to visit family and decided to quit.

Like I said, this post is to not generate debate over breastfeeding, but to hopefully show other moms that they are not alone and to also show that there are other options. That’s the great thing about being a human and having such creative and wonderful minds. We have come up with ways to feed and care for our babies when what appears to be the natural solution seems to fail us. People created pumps and formula so that those of us who are nursing challenged can still sufficiently provide nourishment for our children.

And by the way, providing nourishment is only part of being a mom. If how you do that defines your whole existence as a mother, then yes, you will feel like a failure like I once did. And yet, I can look back now and see that my time those first few weeks with my daughter would have been much better spent holding and rocking her rather than fussing over something that is so inconsequential as how I got food into her stomach. In other words, as long as the food is there, who gives a rip how it got there whether it’s by breast or bottle.

And that’s what DIDN’T work for us in the baby years.

Go visit We Are THAT Family to see more Backwards WFMW posts... you might be able to give some advice or just a little nod of encouragement by telling someone, "Yeah, that doesn't work for me either."

Previous Posts from "WFMW: The Baby Years" series:
Schedules/Routines
Cloth Diapering
Homemade Baby Food


(Again – I’m not looking to start a debate or for anyone to tell me how I could have made it work better by joining La Leche League or anything. The point of this post is that it just didn’t work for us and that’s okay. Please keep any comments or remarks in a positive and encouraging tone. Thanks.)

Tuesday, March 17, 2009

Works for Me Wednesday - Leftover Egg Whites

I have several recipes that call for several whole eggs plus one or two egg yolks.

For the longest time, like before I had kids, worked full time and had money to burn, I would just separate those eggs over the sink and let those egg whites go down the drain. I found out later the tip that I am sharing with you today.

You can freeze egg whites.

I have a myriad of small containers around my house that have been used for everything from homemade baby food to snacks to carry in the car. So any more, all I do is separate the egg so that the white goes into one of these containers, slap a lid on it, and stick it in the freezer.


"What then," you ask?

Simply thaw and use. I have thawed mine using the "defrost" setting of my microwave for 30 seconds or so. Or if you plan ahead, like I am unlikely to do, you can just set it out for a little while. They really thaw fairly quickly.

"What do I use them for," you ask?

Lots of things. While I've read that a previously frozen egg white is not as useful for whipping into a meringue for a pie or angel food cake, it is fine for many other purposes. For example, it can be used:

* In your scrambled eggs to increase the volume with out increasing the fat.
* To make an egg white omelet.
* For an egg wash (1 egg white + 1 tsp water) for browning a pastry.

And those are just a few.

Can you think of other uses for egg whites? Maybe you'd like to leave a comment with your idea of how previously frozen egg white can be used.

That's what works for me.

For other Works for Me posts, visit We Are THAT Family.

Tuesday, March 10, 2009

Works For Me Wednesday: Kitchen Tips - Onions


The onion. It's probably one of the most used ingredients in the American kitchen, and yet one of the most difficult to master. If only it didn't have that darned defense mechanism of making you cry.

Well, to be honest, I don't know if they make you cry, but I look as if I've watched the movie "Rudy" for the 5 millionth time after chopping up one of these bad boys.

I've tried all the tricks to keep from crying. I can't even remember all the things I've tried, and yet nothing has ever worked.

So, I thought I'd share today what works for me in chopping / dicing up onions. Maybe you'll find it works for you as well.

First, I cut of either end of the onion.


You will notice the onion "juice" seeping out. This is important to note because I have found that rinsing off the exposed edges where this milky white "juice" comes out can help in delaying the onset of the stinging and watering that will certainly ensue.


Quarter and peel the onion.


Now, rinse off the onion quarters.


I have many times tried to chop onions like the real chefs do, the way I learned in the few cooking classes I have taken. It has just never worked all that well for me. So, this is what I do.

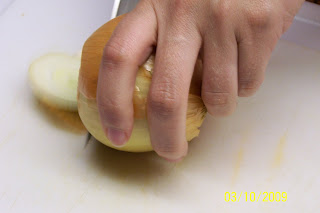
First slice the quarters into relatively thin slices.


Then take the slices and chop. Notice the knife I'm using. I find that it works best when using a good chef's knife so that you can get the rocking up on the tip and back down motion.


Notice how I am gripping the back end of the knife itself and not just the handle. I find this gives me the most control and force on the knife.


If you're like me, at some point, you will have to eventually just set your knife down and step away for a moment and compose yourself while the air clears of the eye stinging molecules.

The end product...


And not even any finger tips in the mix. (I was actually a little nervous to demonstrate this for you guys today.)

(Oh, and by the way, the finger has healed nicely. It's pretty much back to normal. That is if you don't count the huge divot that was left.)

So that's what works for me when dicing onions and trying to keep from crying in the process. It doesn't keep the tears completely at bay, but my discomfort is much less now that I rinse off the exposed edges of the onion. Heck, maybe you'll find that this works for you as well. Or maybe you have your own onion tricks or tips. Please do share them when you leave a comment.

Thanks for coming by today and for more Works for Me posts, visit Kristen at We Are THAT Family.

Tuesday, March 3, 2009

Works For Me Wednesday: Kitchen Tips - Knife Organization

I know that today's WFMW theme is "Greatest Hits." However, I've not been doing WFMW long enough to really have what I consider a greatest hit that y'all wouldn't have seen, oh like, two weeks ago. So instead, we begin a new series of kitchen tips starting with one of my favorites. My very own greatest hit.

Knife Organization

I have been into so many homes of friends and family and tried to cook in their kitchens only to find that their knife situation makes me crazy.

And all my friends say, "Yeah, we could tell!"

I don't hide my feelings on such things very well.

But I digress.

I see knives just stored in drawers or wherever with no thought or method to it. So my tip is: Be intentional about how you store your knives.

For example, mine are stored in a wooden block on my counter top strategically placed to be out of reach of children from any side. But the real beauty of my system is the organization of the knives themselves within the block.

My knives return to the exact same spot each and every time. I KNOW exactly what knife I need and I KNOW exactly which slot that knife is in EVERY time.


I can tell you that in this picture, my knives are, listed from top left to bottom right are: Chef's knife, Sharpening Iron, Santoku, 8 " Carving knife, Bread knife, Fillet knife, Tomato knife, 6" Utility knife, and Paring knife... and of course, the shears on the bottom.

The particular order is not the point, however. It's the fact that they go in the same place every time. That way, when I'm in the middle of prepping my ingredients and my hands are all ookey, I'm not groping around messing up all the handles looking for just the right knife. I can just reach over and grab the correct one every time, pretty much without even looking.

Being intentional about how you store your knives and putting them in the same exact order each time will save you time in the kitchen; both in the knife selection process and in clean-up.

Because who wants to leave ookey stuff all over their knife handles?

(And don't think for a minute that the irony of me talking about knives was lost on me.)

For more Works for Me Wednesday posts, visit Kristen over at We are THAT Family.

Wednesday, February 4, 2009

Works For Me Wednesday: The Baby Years - Homemade Baby Food

I’ve already shared with you about our experience with schedules/routines and cloth diapers. Today, I’m going to briefly share with y’all our experience with making our own baby food for our kids when they were babies.

This was another one of those things where when it came up and I told someone that I made my baby’s baby food, they looked at me like I had three heads and said, “You WHAT?”

This really kind of fits right in with my blog title and tag line… Why should I buy special jars of food for my baby when it’s something that I can easily make at home and be assured it has no preservatives in it? Real food with real texture and real taste. I’m just sayin’.

And really, folks… it’s not that hard.

You cook the food, put it in the food processor, turn it on, and maybe add some water. That’s it.

A general rule of thumb that I use is to cook longer and/or make thinner for the younger babies new at eating solids. The older the baby, you may cook it less and allow more texture by adding less water when in the food processor.

Here’s a run-down of some of the things that worked for me.

First Foods:

Sweet potatoes – The best cooking method is to bake them. Once they are done, the skin peels right off. You will need to add some water to thin them while in the food processor to an easily spoon able texture.

Carrots – Steam them until soft then on into the food processor with some water.

Bananas – Just mash those bad boys up fresh at lunch time. You may add a little formula, breast milk, or water to thin them down at first, but you won’t need to for long.

Applesauce – Peel & core the apples and cook them in your steamer if you have one.

Green Beans – These are a little tricky because sometimes they can have a strong taste and texture that a baby might balk at. We usually steam our green beans, so I had to learn to let them cook longer and adding some formula to them as a thinning agent helped mellow out the flavor a little.

Storage:

At first I did the typical freeze the food in ice cube trays then store the food cubes in large freezer zipper bags. But after not too long, once the baby was eating more solids, I found this method a little cumbersome. I began to use other freezing containers like the little ones you can get from The First Years.

Then I found these Freezer Canning Jars by Ball. They were great because they hold several meals worth of food, but not so much that you won’t use it within a day or so of pulling it out of the freezer. Love these things. Even still today.

Self Feeding:

Later on, as they began getting more teeth and self feeding, I would simply cut up ripe peaches, bananas and other fresh fruit. (As an aside, to this day my children are not crazy about canned fruit. They’d much rather have fresh.)

Another thing that also worked well was meatballs. Make them and freeze them in a big freezer bag and you can pull them out a couple at a time. And, the great thing about making these yourself is that you can tailor them to your family’s specific needs. For instance, my son was having some constipation issues as we started solid foods. (He is going to read that 20 years from now and roll his eyes and turn red.) I was able to make meat balls using ground up Triscuts instead of regular bread crumbs to give him a bit more fiber in his diet to, um, help things along, as it were.

Then, it wasn't too long before our kids were just eating what we had at the dinner table, or some appropriate variation of it. Even from this early age, I stood fairly firm on not being a short-order cook and had the mantra of, "You can eat what's on the table or you can wait until the next meal. Granted, my kids are early teethers and had a mouthful of molars by the time they were a year old. I'm no help to those of you with late teethers. Sorry.

So, making my own babyfood really worked well for me. Maybe it will work for you as well.

For more Works for Me posts, visit Rocks in my Dryer.

Wednesday, January 28, 2009

Works for Me Wednesday: The Baby Years - Cloth Diapering

As I said a couple of weeks ago, I'm stepping back in time and telling you what worked for us when my kids were babies.

When my daughter was born nearly eight years ago, I was kind of “out there” among my friends because I used cloth diapers.

If something came up about it and I told people that I used cloth, I would frequently get asked, “Why?” Not just any, “Why?” either. You can’t hear the inflection in my voice, but imagine if you will the sassiest way to say, “Why on earth would you EVER consider doing something so insane,” in one word. “WHY?”

In short, I used cloth because it was more economical, seemed better for my baby’s bottom, I didn’t have to feel bad about putting out a bunch of trash, and hey, they are just so darn cute.

Cloth diapering is much more common now, eight years later, but I will tell you today why and how cloth diapering worked for me.

I initially got the idea from and had the example of my middle (older) sister. She used cloth with her oldest, a son, and didn’t have any problems with it, so I thought I’d give it a try.

Also, I was at home with both of my children for at least a year. I didn’t see any reason why not to try it if I was going to be at home full time and would have the time for the laundry involved. I did go back to work (when my daughter was 1 and when my son was 2 ½), but it continued to work for me I think because I had the opportunity to get my routine down while I was at home full time.

Now, nuts and bolts time. What exactly worked for me, diaper wise?

Initially, prefolds. Not your Gerber prefolds from the local Target or Wal-Mart. I’m talking about good Chinese prefolds that I could only find online. My sister pretty much exclusively used prefolds for the sake of economy, but she also just didn’t get out there and do any research like I am prone to do. She didn’t know about the many additional options that were available.

But even among the other options, I found that in those earliest weeks and until we were getting out a little more and until the baby was eating solids, thusly making more solid poops, prefolds did the best job of keeping things contained. They gave the best fit and were the most adjustable with a rapidly growing infant. And with the advent of the Snappi and Bumkins wrap covers, pins were obsolete which made them all the more attractive.

Now, I will say that prefold diapers are not that convenient when you are out and about at the grocery store, or Target/Wal-Mart, or anywhere else for that matter. Enter the all-in-one and, later, pocket diapers.

I discovered all-in-one diapers with my daughter and bought several. At this point, I was not very adventurous and mostly bought Bumkins AIOs. This is what we ended up using when she went to the babysitter’s house while I worked part time once she was a year old. They worked fine and were pretty darn cute as well. And I’ll admit this is when I was HOOKED on cloth diapering.

I began to discover that there were even more options out there, but by that point, our system was working just fine and I couldn’t justify spending any more on diapers when she would be potty training soon. I would just have to wait until #2 came along.

Pun TOTALLY intended there.

Again, prefolds worked great in those earliest weeks and months, and up until about 6 months that’s almost exclusively what we used. But I did begin buying some pocket diapers, which I think are about the best thing since sliced bread.

Now you ladies that have recently begun cloth diapering have it SO easy since you can purchase a one-size adjustable pocket diaper. Back in my day, I had to continually buy new sizes and sell my old ones. eBay was always open on my browser (back then you could buy and sell used diapers on eBay – you can’t anymore) and I was always looking for something new to buy. I had several online forums that I would get ideas from and actually enjoyed the process of looking at all the different types and deciding what to get.

Brands that I liked this time around? Fuzzi Bunz worked fine at first as I began to experiment with pockets. Then, as my son got older… and BIGGER… they quit working so well for us. Happy Heineys (HHs) and Knickernappies Disposanots (KNDs) both had a taller rise (in the front) and kept things (ahem) contained a little better. I also used one or two Green Acres Designs (GADs) and like them as well, but not as much as the KNDs.

I enjoyed cloth diapering my kids. So much so, that I have had several friends actually start using cloth as well. It worked really well for us.

For other “Works For Me” posts, visit Rocks in my Dryer.

Wednesday, January 14, 2009

Works for Me Wednesday: The Baby Years - Schedules/Routines

Since I wasn't blogging when my kiddos were babies, I thought I'd take a stroll down memory lane with you for a moment and reminisce about those years. I am going to spend a few Wednesdays looking back at what worked for us when our kids were babies.

Pardon me if I get a little bit on my soap box here for a minute, but I'm a little tired of always reading posts about how bad it is to have a schedule with a baby. OK, so maybe "always" is a bit of a reach, but I definitely see more posts against it than for it.

I have even noticed that when I see a post about how bad it is, people won't even mention the name of "the book" where they read about scheduling like it's too awful to utter.

Get real. OK?

I read the book "Babywise" and I used a schedule/routine with my kids when they were babies.

I can hear the collective **GASP** right now.

You'll get over it, I promise.

Anyways, I'm here today to tell you that it worked for me and for us as a family. It may not work for everyone, but it worked for us, and I think there are several reasons why.

For one thing, both of my kids had jaundice when they came home from the hospital. Not so bad that we had to use the lights or blankets or anything, but noticeable.

With jaundice, it is my understanding from my lactation consultants that the bilirubin in the bloodstream acts like Valium to the baby and makes them very sleepy. In other words, neither of them ever woke up to eat in those very early weeks. They would sleep right through, if I would have let them.

So, take a dopey, sleepy newborn and add in a mom whose milk won't come in until about 5-6 days post partum and you have a potentially disastrous mix. Except that we stayed on a schedule.

I woke them up every 3 hours to eat around the clock that first week. After the first week, I still woke them every 3 hours to eat during the day. If I had not done this, there is no way either of them would have gotten enough calories to flush the bilirubin out of their systems, the jaundice would have gotten worse, making them even more sleepy, and we would have probably ended up in a "failure to thrive" situation as things spiraled downward.

I tell you that first week was a beating. No milk was in yet, so each feeding cycle consisted of me trying to get them to nurse, then passing the baby to someone to bottle feed while I pumped, and then starting this process over again almost immediately it seemed. This went on for weeks with both of them, but that may be a different post altogether. A what didn't work for us kind of post.

But I digress.

My point is that the schedule was hard at first, but I believe it was absolutely necessary and the key to what helped both of my kids thrive from a feeding perspective when they were babies.

Another reason why the schedule worked for us was that both us and the baby knew what to expect with respect to sleeping. This is where calling it a routine seems more appropriate to me.

As both of my babies got a little older we were getting out more. Having scheduled times for naps helped me feel confident that when we did go out during wake times, my baby would be in a generally good mood and well rested. It allowed me to schedule appointments and outings during my baby's best times of the day because I knew when those times were, consistently. And I knew how long I could stay out before things would start going south.

I think it also put them and I in a rhythm of a nap-time and bedtime routine which I think eased the transition into sleep-time. Going down for a nap wasn't always a snap, but most of the time, my babies looked forward to it and I remember that both of them smiled a lot when they got in their crib for naps.

Both of my kids took a minimum of 2 naps a day until they were well over a year old. They both transitioned to one nap per day in the 15-18 month time frame. Even still, my 3 1/2 year old still takes an afternoon nap. He is showing signs of beginning to transition out of naps, but he still needs them and loves them - despite his verbal protests.

Really what it boils down to is that the schedule/routine gave me confidence that I was doing everything in my power to get my baby fed enough and enough sleep. That's not to say that we didn't have our off days, hiccups, and special occasions when our routine was altered. Because where there is routine, there must be flexibility. However, our routine was just that, a most of the time scenario. It gave our day a framework and something to build upon from the beginning.

I will also say this... it helped that I am the youngest of 3 sisters. So I had the added benefit of seeing baby routines and schedules in serious action for several years before my first was born. To this day, I don't know how my sister would have survived the triplets without a schedule.

My guess is that many of you, whether or not you subscribed to the "Babywise" routine, had or have some sort of routine with your baby. I'd like to hear about it, if you would like to share in the comments.

And for more Works for Me posts, head on over to Rocks in my Dryer.