Search This Blog

Showing posts with label FOTM. Show all posts

Saturday, February 27, 2010

Simple Chocolate Cake {Flavor of the Month}

bakeat350_flavor_large

February’s flavor of the month with Bridget over at Bake at 350 is chocolate.

Ohhhhh yeeeeaaahhh.

Read. My. Lips.

Cho---co---late!

This is not a hard topic for me. Because chocolate is like second nature to me. I mean, you know how I adore my friend Lisa over at Stop and Smell the Chocolates (where I am also linking up this recipe for her weekly Chocolate Friday carnival). But I hadn’t made anything new lately.

Then I came across this recipe in one of last year’s issues of my favorite cooking magazine, Cook’s Illustrated. I had been wanting to try it and all of the sudden one afternoon I had an insatiable chocolate craving. The kind that the candy version just wouldn’t fill. I needed a baked good. Enter this Simple Chocolate Cake recipe.

This is a surprising little cake. The surprising ingredient is mayonnaise. NOT “salad dressing,” mind you. No. The real stuff. Mayonnaise.

It was a method used in war-times when butter and eggs were scarce due to rationing, so the mayonnaise served as a substitute for those ingredients. However, the writer of the article was working to bring out more chocolate flavor in it and invited coffee to the party along with a combination of cocoa powder and solid chocolate.

It is a perfectly sized small cake so that there is not the guilt of making a whole big cake that your family would never finish. And, it is definitely simple enough for a week-night dessert.

(I apologize ahead of time for the availability of decent pictures for this recipe. We, um, well, we kind of ate it… fast.)

Simple Chocolate Cake
from Cook’s Illustrated (March/April 2009, pg. 25)

100_7299

Ingredients:

1 1/2 cups (7 1/2 ounces) all-purpose flour
1 cup (7 ounces) sugar
1/2 teaspoon baking soda
3/4 teaspoon table salt
1/2 cup (2 ounces) Dutch-processed cocoa powder (or “Special Dark”)
2 ounces dark, bittersweet or semisweet chocolate (chopped fine)
1 cup hot coffee (or equivalent mixture of hot water and espresso powder)
2/3 cup mayonnaise
1 large egg
2 teaspoons vanilla extract

You will also need:

8 inch square cake pan
Non-stick cooking spray
1 large mixing bowl
1 small-medium mixing bowl
Confectioners’ (powdered) sugar for garnish

Method:

Preheat oven to 350 degrees F and prepare cake pan by spraying with non-stick cooking spray.

In large mixing bowl, whisk together flour, sugar, baking soda and salt. In smaller bowl, combine cocoa powder and chopped chocolate; pour hot coffee over cocoa/chocolate mixture and whisk until smooth. Let this mixture cool for several minutes then whisk in mayonnaise, egg and vanilla. Pour mayonnaise/chocolate mixture into flour mixture and stir until combined.

Scrape batter into prepared pan and smooth it all around. Bake for about 30-35 minutes or until toothpick comes out with few crumbs attached after being inserted into the center of the cake. Note: the cake will have a nice rounded domed middle and cracks on the top. This is normal.

Allow cake to cool in pan on wire rack for 1-2 hours. Turn cake out onto serving platter and dust with confectioners’ sugar to serve.

Sunday, January 3, 2010

Chocolate Covered Cherry and Candy Cane Sugar cookies{Flavor of the Month}

Prepare yourself.  This is going to be the lamest Flavor of the Month post you have ever seen.  Not only did I forget about my post until two days AFTER the deadline, I didn’t get around to actually doing anything about it until a good day and a half after that.

Life is what it is, though.

I did make quite a few cookies in the month of December, so here’s a sampling of what I made.

Chocolate Covered Cherry Cookies:  this recipe can be found here on my recipe blog.  It’s actually been there a while, but I haven’t had any pictures to go with it.  I will be adding some soon now that I have them.  These are REALLY good when they are warm and gooey and a little bit of an adult cookie offering.

 100_6979

Candy Cane Sugar Cookies:  I love this idea for the person who doesn’t want to mess with the cutting and decorating of homemade sugar cookies.  Just color half of your sugar cookie dough red with gel coloring (like used for icing) and make candy canes.  They are a little fragile, but oh so cute.  I was inspired by and used this recipe for sugar cookie play dough but I’m certain any recipe would work fine.

100_7046

I highly recommend that you hop on over to Bridget’s blog, Bake at 350, to see more cookie posts for December’s Flavor of the Month. 

Sunday, November 29, 2009

Popcorn Cake – My family’s tradition {Flavor of the Month}

Never heard of it?

Well, I must say I’m not surprised.  My man had never heard of Popcorn Cake before being indoctrinated at his first holiday event with my family.  While he thought it a little weird at the time, he admitted to me this evening that it has grown on him and he really likes it now.

I very literally cannot think of a holiday season in my family where Popcorn Cake has not been involved to a great extent.  It is a mainstay in my family that has been passed down from my dad’s mom (Nana P) to my mom and now down to my sisters and I and our kids. 

100_6794 It is similar to a popcorn ball, but in cake form and better.  It’s not quite so hard and difficult to eat.  It’s a little expensive to make with all the candies, peanuts and popcorn, but SO worth it. 

And just look how cute and festive it can be by just using holiday specific M&M’s.

100_6691

Its sticky, chocolaty, crunchy and gooey all at the same time goodness is something that will forever evoke memories of time with family.  Be it at my Nana P’s or my mom’s house.  It will always remind me of my Dad and his expectation that there is one in the house at all times.  It will remind me of Christmas and a myriad of other holidays that were not complete without this dear friend of a dish around.

So now I share with you the recipe.  More detailed step-by-step photos can be found on my recipe blog here.

Popcorn Cake

1 pound M&M’s candies *
1 pound dry roasted peanuts
1 gallon popped popcorn (approximately 2 microwave bags) **
1 pound marshmallows
½ cup vegetable oil
½ cup margarine ***

* Holiday specific M&M’s make this a special treat for any holiday.
** Get as close to no butter popcorn as you can.
*** I rarely use margarine any more. However, my mom tried butter while living overseas where she couldn’t get margarine and it didn’t work so well.

Pop popcorn and allow to cool. You may want to shake out the popcorn in a bowl to get all the un-popped seeds out.

In a very large bowl, place M&M’s, peanuts and popcorn in that order with M&M’s on bottom, peanuts on top of the M&M’s and popcorn on top of that.

In saucepan over medium heat, begin melting margarine and add oil and stir. Add in marshmallows and begin stirring while allowing the marshmallows to melt. Stir constantly with a heat-proof spatula/spoonula. Allow to boil until approximately 230ºF. The mixture will be translucent when coating the thermometer or against the bottom of the pan when you tilt it to the side.

You can do all of the above in the microwave. Just be very careful about the marshmallows expanding and overflowing your bowl.  Not that I know from personal experience or anything.

100_6765 Reason # 1,253 I dislike using the microwave for cooking.  I’ll take a cook top and saucepan any day of the week thankyouverymuch.

Once the marshmallow mixture is finished cooking, pour it over the popcorn. With two wooden spoons, mix the hot marshmallow mixture into the popcorn and gradually incorporate the peanuts and M&M’s at the bottom of the bowl as the mixture cools a bit. Mix until all the ingredients are evenly distributed. (Or until at least mostly evenly distributed.)

Lightly spray angel food cake pan (or Bundt) and hands with cooking spray. Using hands, press the popcorn mixture down into the pan. This recipe will completely fill an angel food cake pan and fill a Bundt pan with a little left over. Allow the pressed cake to cool in the pan for a while (maybe 30 minutes to an hour) until the cake has set and firmed up.

Turn cake out on platter or cake taker that can be covered. You may have to lightly squeeze the pan to release it or you may use a hair-dryer on the outside of the pan to warm and release it. Continue to allow the cake to sit out and set up in open air at room temperature for another hour or so.

100_6792

100_6798

Use a sharp bread knife to slice the cake and eat it with your fingers. And eat some more… and some more… you get the idea.

Here’s to the next generation of Popcorn Cake lovers.

100_6802   100_6800

Enjoy!

And join us over at Bake at 350 for more family tradition dishes for this month’s installment of Flavor of the Month.

bakeat350_flavor_large

Friday, October 30, 2009

Foodie Friday: Pumpkin Cake Truffles {Flavor of the Month}

bakeat350_flavor_large

For this round of Flavor of the Month (hosted by Bridget at Bake at 350), our challenge was pumpkin.

Now, it is my understanding that our creation can even just be in the shape of the challenge and not necessarily the “flavor” of it.  Well, I took liberty in that this month since I don’t normally make a lot of pumpkin flavored things.  I made a pumpkin pie once… none of us were all that crazy about it. 

I know, I know… “That’s just crazy talk.”

But it’s true.

So I present to you my pumpkin shaped and decorated, but not necessarily flavored, cake truffles. 

100_6517

100_6511

Now, I think I’ve already made it clear that I did not use a pumpkin flavored cake inside these.  What flavor did I use?  Well, I’m glad you asked.  Inside of each of these beauties is Orange Vanilla Spice Cake held together by a Cinnamon Browned Butter Icing.  Click on the names and it will shoot you over to the recipes on the recipe blog.

I learned a couple of things in the process of making these truffles.  Lesson #1: I learned that I don’t have time to make cake truffles very often.  I just don’t.

Lesson #2: Red candy chips are really powerful, color wise.  You see, there were no orange candy chips on the day I went to Hobby Lobby so I used my mad Kindergarten level science skilz and decided that I should be able to make the color I wanted by using the yellow and the red chips that were available.  So I measured equal amounts of each and melted them.

100_6468 But instead of orange, I ended up with….

100_6469 just a really funky light reddish color.

So, I pulled out my gel icing colors and found my yellow and began to add it in.  The color got better and was just about right when all of the sudden…

100_6472 100_6471

The whole thing just clumped up and solidified on me.  Lesson #3: You can only add so much gel food coloring to melted candy coating stuff before it revolts.  (Lesson #3a: I am seriously considering whether this candy stuff is something I want to put into my body if it has that kind of a chemical reaction to a little food coloring.  I’m just sayin’.)

So I started over and used much less red and finally got the right color.  That whole process was way harder that it had to be.  Lesson #4: Hold out and look for the correct color of candy chips instead of trying to mix your own.

And once I had established a pattern of how to decorate the pumpkins, I discovered another lesson.  Lesson #5: Dipping the cake balls in the melted candy stuff goes a lot better when the bowl is full and the candy is freshly melted & warm.  Once the level gets too low and the candy begins to thicken from cooling off, you get pumpkins that look like they came from Chernobyl.

100_6495

So… nuts and bolts.  How did I make them? 

For the cake balls, crumble up your cake and add enough icing so that the crumbled up cake sticks together like a rough dough.  Then for uniform size, use a scoop (like an ice cream scoop) to measure out your cake mixture and roll it in to a ball.  Cover and refrigerate.  (There are also instructions at Bakerella and The Pioneer Woman Cooks.)

Put half of a pretzel stick in the top of each cake ball to act as the stem.  Coat the cake ball in the melted orange candy coating stuff.  While it is still wet, use a toothpick to draw the stripes going down the pumpkin then set aside to harden.  Decorate with butter cream icing using the #67 decorating tip for the leaves and the #1 decorating tip for the stringy things.  See the picture album below.

And for heaven’s sake, let your kids give it a try…

100_6501

Letting Sarah get her hands on my Pumpkin Cake Truffles stressed me out immeasurably, but it’s something I must make myself do.  And, she enjoyed it.

Happy Halloween, y’all!


Recipes in this post:
Orange Vanilla Spice Cake
Cinnamon Browned Butter Icing

Friday, August 28, 2009

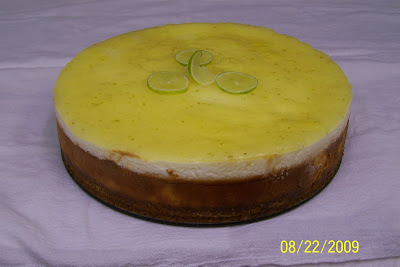
Foodie Friday: Key Lime Cheesecake (Flavor of the Month)


This month, Bridget at Bake at 350 gave us a Lemon / Lime challenge for our Flavor of the Month.

I’ll admit, I was having a hard time coming up with what in the world I was going to do. At first I thought I’d share with you my Lemon Thyme Grilled Shrimp… but then I realized that’s not a “baked” dish like Bridget would be looking for. Could I do a sorbet? A cookie? And then it hit me.

A while back I mentioned (in this post) that my mother in law had passed on her Cheesecake cookbook to me along with her prized Key Lime Cheesecake recipe. I had yet to try to make it, so I figured this was the time.


I did a little research on Key Limes and this is what I learned

* They are not indigenous to the Florida Keys, but were brought there and became naturalized.


* They range in size from ping-pong to golf ball size.
* They are greenish-yellow when ripe but are picked green commercially.


* They have a higher acidity than regular Persian limes.


* 25 key limes render about 1 cup of juice (from my own testing in the kitchen).


(sources: http://www.keylime.com/diff.html and http://en.wikipedia.org/wiki/Key_lime)

Without further ado, the Key Lime Cheesecake


The recipe can be found on my recipe blog.


As a side note, Bridget, I am really enjoying the Flavor of the Month Challenge. It is encouraging me to get out of some of the baking ruts I can get into when I find a recipe that I like and stick to it. I'm trying new and different things, and that's what it's all about, right?

To my readers, if you want a baking challenge, then please participate with us. You can read all about it here.

Friday, July 31, 2009

Flavor of the Month - Pie.... Blueberry Pie, that is.

Bake at 350


This is not the best post I'll ever do for Bake at 350's Flavor of the Month, but it will get the job done this month.

I have been planning to make Simply Recipes' Blueberry Pie for the Flavor of the Month for quite a while because I had never made a blueberry pie before. But, I just hadn't had an occasion to make it.

I even tweeted last week that "I really need a reason to make a blueberry pie. Really."

The responses I got ranged from "Why do you need a reason?" to "Blueberry ends in -y and Thursday ends in -y. Sounds like a good reason to me."

Fair enough.

But I finally found an occasion. My parents will be at my house tomorrow, so we'll have someone to share the pie with. Because what is the use in baking if you have nobody to share with.

So, here I am at 11:45 pm on the last day of the month when Bridget is hosting Flavor of the Month. I've just taken this beautiful pie out of the oven and haven't even tasted it yet.


Again, I used the recipe I found at Simply Recipes except for the crust. I used my favorite pie crust from Cook's Illustrated. I'll have to share that recipe later.